Posted on

KTE LCR-1 MK4 Phono Pre-Amp – setting the bar very high for Vinyl Lovers.

[metaslider id=6638 cssclass=””]

KTE LCR-1 MK4 MC / MM / MI / MF – LCR RIAA Phono Stage 


This is our 2020 MK4/version of LCR-1 RIAA phono which is the most expensive investment in the past 11 years. Kevin Valab’s experience in phono stage design and LCR choke building experience teamed with KitsuneHiFi to further tune and get the very most out of a Phono Stage. Total of 8 revisions have been designed/built and now what you see is our workout in past 4 years.

If you are serious analog audiophile then its quite possible that you may have a dream to have a LCR RIAA phono stage and know these can be very expensive. Typically the price is too much for many as well as they are somewhat rare. For LCR RIAA EQ it is so difficult to build and they require inductors that are extremely expensive. 
We work closely with James Audio in Taiwan to develop these LCR RIAA EQ chokes and are custom made to our specification. It uses high Permalloy cores and 6N OFC wire for these chokes. It has incredibly low DCR and capacitance. Each choke has 2 layers of electro magnetic “EMI” shielding to assure very low interference.

New full discrete circuit design which works at higher voltage to drive LCR equalizer and followed by discrete class-A circuit as output stage, all transistors were carefully matched, and full DC design.

New LCR inductor which is 3 times larger than the last version, but have only 1/3 inner resistance. These cost significantly more but will be worthy investment for new LCR equalizer and get perfect linear curve and ultra low distortion! They deliver music with significantly more detail and especially have very good micro dynamics. 

No capacitors in signal path and No-feedback LCR EQ circuit. 


What you see here is KitsuneHiFi’s best implementation of the LCR-1 MK4 and is based on intensive investment and research and development. 

Separate power supply design to eliminate EMI and vibration from power transformer. So this phono stage is incredibly quiet. No audible noise even with 100db level with speakers. 
How’s it sound? While it’s the best Phono we have ever heard. It’s incredibly dynamic and pulls details out of analog vinyl that most phono stages cannot achieve. Staging is incredibly deep and wide with excellent separation. Foot tapping worthy.

 
It is full of components that are quite high in cost and implementation. You can see and appreciate the photos on this phono stage. All parts are carefully chosen,  Dale resistors, James Audio LCR RIAA EQ chokes, Panasonic and SIC-Safco, Nichicon, Vishay capacitors and more. OCC internal wiring for signaling. Almost no budget concerns, we use best sounding and most reliable parts based on our experience. 

Each KTE LCR-1 MK4 Phono stage is fitted with a discrete voltage regulator that has -125db PSRR and about 10uV output noise/ripple. This in turn allows the phono stage to deliver super detailed sound stage and micro dynamics. And of course excellent SNR.

Most importantly, we use expensive choke based LCR RIAA Equalization instead of conventional RC RIAA.
In conventional RC RIAA circuit, music signals are ‘digested’ in resistor-capacitor filter for it’s large value resistor in circuit.
While in LCR RIAA, almost all music details preserved! You can easily hear more music details and subtle nuanced that would otherwise be lost in most other phono stage circuits. 
So if you use LCR RIAA, your analog system can easily output ultra high resolution like a top end digital audio system and of course, very natural analog sound.  Must be heard to appreciate!
LCR RIAA phonos all sold at incredibly high prices. We developed this product to deliver a reasonable price to the most demanding analog audiophile. We believe there is no compromises in sound quality and the KTE LCR-1 MK4 pairs perfectly with high end cartridges/turn tables. 

Specification:

Adjustable Gain: 100X (40db) 、 400X (52 db)、 800X (58db) 、1000X (60db) 、1250X (62db) 、1500X (63.5db) 、1800X (65db) 、2100X (66.5db) 、2400X (67.5db) 、2800X (69db) 、3000X (70db) 、3600X (71db) 倍、4000X (72db)
Adjustable Impedance:  47k、200Ω、150Ω、100Ω、85Ω、66Ω、60Ω、46Ω、20Ω、18Ω、16Ω、14Ω
Class-A FET , DC coupled, LCR-RIAA Equalized
30VA 24V R-Core  power transformer, offering massive dynamics and more than enough power than it consumes. 
6N OCC Copper internal wire for signaling
Frequency Response: 20Hz-50kHz +/- 1db
(SNR) Signal/ Noise ratio : 104 db on MM/ 95 db/MC

Posted on

KitsuneHiFi to announce HoloAudio’s May Dac

We are proud to announce the new flagship dac for HoloAudio! Introducing May dac.

no….it’s not coming out the Month of May and has nothing to do with the month of May. It’s finished now! thank you everyone for being so patient! It has been a long time working on this masterpiece. Both Level 1 and Level 2 versions of the May dac are complete! And the Kitsune Tuned Edition is very close to being finished!

KitsuneHiFi will be accepting preorders very soon as we have been getting tremendous amounts of emails about this and want to let people know what to expect. Check back with us soon! We estimate to have it up online end of this month.

Why did we choose this name?

MAY = “the possibility of”

This dac truly sets the bar high for all discrete dacs. Our anticipated KTE (Kitsune Tuned Edition) version of the May dac is coming January of 2020! KTE May will have hand selected dac modules with EMI/RF CNC machined covers for each dac module, exclusive capacitors, and several KTE modifications. KitsuneHiFi is pushing the limits to get the most performance & sound quality possible!

Truly all May dac’s are spectacular and we have three choices.

For those who want to know pricing/specs: *all three models are black/copper chassis and KTE models have KTE copper emblems

Level 1 May dac will be 3798usd + Shipping

Level 2 May dac will be 4298usd + Shipping

KTE May dac pricing and specifications will be announced soon!

Read about AudioScienceReview’s measurements on the May dac (Level2 May)

Click Here to read more information

[metaslider id=6499 cssclass=””]

Posted on

Dec15th 2019- Washington DC area HeadFi meet – our KTE Spring2 will be there with Will@Lineartubeaudio.com

https://www.head-fi.org/threads/dc-area-meet-december-15th-2019.919067/

link above to forum with more info – Visit Will @ Linear Tube Audio while you are there! our dac will be with them for demo.

Come join the Washington DC/Maryland/Virginia headphone enthusiasts for an awesome pre-holiday meet! Come enjoy that piece of gear that you can buy yourself in the coming holiday season!

Previously, we usually leveraged some free venues (usually libraries), but this time around, we’ll be doing things a bit different. A local head-fier, @blacktone , has offered us an amazing space for our listening pleasure.

Details:

Where:
6363 Walker Lane STE 300
Alexandria, VA 22310
Part of Metro Park
MetroPark.png
https://goo.gl/maps/PB38VuWCiv8xguxs5 (shows the road for dropoff, entrance to bldg, & garage)
Just a short distance from the Franconia-Springfield Metro (~15 min walk or 4 min Uber) and equally short distance from the beltway!

We’ll have access to a fantastic space (see attached), complete with multiple conferences rooms that we’ll have set up for quiet listening, internet (that will work better than the library), and plenty of outlets (outlets still need power strips!). Again, thx to @blacktone for setting this up. There’s also a parking garage! The building does have locked access, but prior to the meet, a group of us will work on a proper system to get people inside post haste!

When:
Sunday, December 15th
9:30AM – 6:30PM

Some of us will probably grab some food after if that is of interest and as always, feel free to show up when able!

Let us know if you will be attending and what you will bring! Nevertheless, always feel free to come as you are and try what there is to offer! We’re always happy to meet new enthusiasts! (and don’t forget power strips for your gear!)

Also, we’ll be trying something new at this meet. At previous events, we’ve heard interest in having more in-depth setups that will allow attendees to test different parts of an audio chain. With the help of some members, we will be doing exactly that! (Level matched of course…to the best of our ability. I think someone has a SPL meter >.>)
Right now, the plan is to have 2 such setups:
DAC comparison setup – feeds multiple dacs via 1 source, these will all output to the same amplifier
Amp comparison setup – 1 DAC feeds multiple amps at varying price points, feed into a switchbox and into your headphones!

Posted on

We are now a Meze Audio Authorized Dealer.

Just a quick update, but we are now stocking Meze Audio headphones. Specifically we have the Neo Classic and Neo 99 as well as the new flagship Empyreans! Please contact us for more info. We will have these amazing headphones in our store soon. And will be accepting orders for these models and more to come soon!

https://mezeaudio.eu/pages/dealers

we are on their list of dealers as you can see. We are just working on the addition of the products and excited to be offering such top tier products to our store.

Click here for more info on the Empyrean

Posted on

KitsuneHiFi – Custom Water Cooled PC build

Here is a custom PC that we had recently built and have entered into a contest @ builds.gg

Please check it out and support us! vote for our build so we may have a chance to win prizes. Voting has already started but ends March 21st 2019.

https://builds.gg/kitsunehifi/kitsun-fox-build-chromed-red-copper-2019-9908

My name is Tim and I’ve been building computers since I was eleven years old and now approaching 38 years old! To some of you that makes me an old fart. I love how computers have evolved over the years and now they have become a passionate hobby and are more expressive of our personalities. Sure, it was a passionate hobby for me when I was young, but it certainly wasnt cool or “rad” at the time. I was a complete nerd and most of my friends did not have computers or have any interest in them.
As innovation has improved, pc components are now fit and finished and appearing beautiful even. My old machines were beige towers and didn’t even need heat sinks for many components like CPU’s.

I still remember my biggest mistake ever while building a computer. I was about 11-12years old and assembling a 486 dx 50 which at the
time was a beast! All other cpu’s had a front side bus speed of 25mhz or 33mhz yet this machine actually had a FSB of a blazing 50mhz! 
My Father and I were building the machine, which btw was meant to be for him. I was carelessly installing the cpu into the motherboard and didn’t take note of the orientation of the chip and it’s corner which is marked. And no, they are not keyed to prevent installation with incorrect orientation…. so when it came to turning the power in to the board/cpu it had a peculiar looking red dot in the center of the cpu and I thought to myself, “wow, that’s neat, a little orangish red light on the chip!”. My child like mind decides to immediately touch this little orange colored light and good lord I was in for a surprise! That was cherry red hot ceramic where a pin of the cpu was literally burning a hole through the motherboard socket! Mind you, this happened all within 10sec of powering on this system for the first time. My finger tip was wiped of its indentity by a horrible burn and a funny smell of flesh and burning plastic. This my friends is my most embarrassing moment when building a computer. Thankfully Since I was just a child I can laugh at this easily. I’m so glad that today’s machines practically fall into place with keyed components and connectors that cannot be mistaken. For those who are a vintage fart like I am, they know that older machines really didn’t have these fail safe designs. Enough of my past, let’s talk about my most current build. Which to some they may find it a bit insane that it has about 40+ fittings into this build for a very expensive yet cool looking result of hard line tubes and fittings everywhere. There is even a drain tube type fitting that is made up of 4 fittings that attaches to the lower drainage port. It’s extremely easy to fill and drain this system since I spent a bit more time planning it all out.

For those who have done full blown water cooled rigs and the even less likely few who have experience with doing solid tube builds with copper piping like that found in my shared build. For those who know, it’s a big undertaking to do builds like this. I’ve have over 80+ hours into this build and lost count of the exact amount of time. So many little things they go overlooked that require so much time to complete. It may be hard to see why it would take so long.
This is one of a whole ton of builds i’ve done in my lifetime. But I think I can say this is my favorite! Realistically I’ve built several dozen custom builds for myself and usually my “epic” builds last for a long time since I rarely spare any expense and go with the best components available.

I chose to go with solid red copper tubing with chrome plating… and was a bit worried about leaks so went overboard and went with a new design of fitting… solid brass and nickel quad gasket fittings to ensure no chance of leaks. In some places the seals were upgraded to monsoon silicone gaskets for a more snug fit.

Some of copper tubes come pre bent 90 degree’s for ease of making a nice clean look. Obviously you can’t bend chrome plated tubes without them cracking…. so very careful planning is required. Of course, a good pipe cutter like the Milwaukee brand pipe cutter really does work well and assists in clean cuts and no scratches. Funny, as I tried 4 different pipe cutters before finding one I found to do a pretty good job.

I can’t stress enough how important it is to get measurements within 1mm accurate. Metal pipes don’t flex at all if compared to soft tubing or even petg hard tubing. Plus the metal tubing is sharp once its been cut…it takes patience to properly remove any burrs and essentially smooth each of the edges to a nice clean finish. A foam sand paper square was used and a dremel for some specific modifications. This helps the assembly process and prevents damaging any o ring seals. It’s worth it!!! Don’t you think?

Obviously, my inspiration was from the Verge’s PC building video and was sure to use enough thermal paste and a little extra just to be sure! I couldn’t forget using my Livestrong bracelet and a good pair of tweezers (sarcasm). This video will never die! haha. Sorry, I had to mention it… maybe one of the greatest YouTube videos last year.

Seriously though, This build is my most ambitious and involved project i’ve done while working with water cooled PC arts. This build is based around the clean and sleek looking Phanteks Evolv X case. Why? you might ask, well I do like the anthracite grey anodized finish and the dual tempered glass panels… But mainly I found this to be one of the most compact size of cases that would fit the hardware I had in mind. If you look carefully you’ll notice how many water cooled bits i’ve managed to fit in a moderately sized case. There is no wasted space with pointless drive bays for hard drives , diskdrives or cd drives. I can’t remember the last time I used a Compact disc. Even the last few builds I’ve done I included a Blu-ray DVD burner whatever and never used it once. So this time would be different. As far as the water cooling, it was very difficult to fit all the gear into this average sized case. Generally it would take a large tower case for this much cooling…. In fact the larger reservoir and dual 360 EKWB radiators barely shoehorned their way into this rather small case.
I wanted epic performance with no compromises. The important factors for me are the following:

1. Must be excellent at FPS at high resolutions like 4K(chose the i9-9900k as the heart) some believe 4K gaming is silly, but it’s doable with the pg27uq monitor, otherwise 60hz is no good.

2. Must be ideal for audio enthusiasts so must be very quiet overall(my audio gear setup is just as impressive as this machine) And must be able to process DSD1024 in HQPlayer with moderate filters.

3. Must be perfect for content creation and photography (sorry for some of the photography, as this project should of been captured with my A7R3, but instead was shot with an iphoneX during assembly. 

4. I’m a water cooled lover however understand that the very best of watercooling comes at a price, and also requires a tremendous amount of patience and extra hours of labor to achieve results that are desired. This is where my OCD comes in and helps achieve a good end result that i’m fairly happy with. This build was started sometime around October 2018 and don’t recall exactly when it’s completed, technically it’s not done since I will be adding a second 2080ti soon, reroute some tubing and also get some slight revised Cablemod pro cables to perfect cable management in the backside which I’m fully aware of. 

So for those who just want to know the specs…. Here is a quick list/run down of what this build has going on inside.

1. Phanteks Evolv X – Anthracite Grey anodized finish

2. Intel i9-9900k – Overclocked @ 5.1ghz all 8 cores (it does a stable OC to 5.2ghz but I didn’t like the temps being higher)

3. Asus Formula XI Motherboard (ekwb watercooling is stock)

4. Teamgroup TeamDark DDR4 Cas14 3200mhz ram (32gb total or 4 sticks of 8gb) (this is the lowest latency ram I could find) – the heatspreaders were replaced with aesthetically appealing EKWB polished nickel heat spreaders. This matches the overall theme i’m going with.

5. Storage – Two of the 970evo NVME 1tb drives… One is for the OS (win10) and the other is for AAA title games. Then there are 3 860Evo 1tb’s for general storage of media. External storage is one 850evo 1tb, one NAS that has 4 drives and total of 11tb of storage, another 4tb WD enclosure, yet another 8tb Samsung drive, and lastly several portable drives from samsung of 1tb and 500gb variants.

6. EKWB 360mm radiators (two of these), EKWB X-RES D5 250 RGB – this is the MAXIMUM size resevoir/pump combo to fit. In fact it required very careful planning and custom fittings to get properly mounted – EKWB CPU water block (Velocity Nickel RGB) – Lastly the fans are a total of Seven Noiseblocker B12-2 120mm – 17db – 1300rpm fans. One exhaust on the back of the case and three for each of the radiators (push out top and pull from the front) – this requires special spacers for the front, as well as special foam gaskets to optimize air flow. The resevoir had a custom bracket I made to properly fit this within the case. Planning the loop was tedious and overall this build was over 80+ hours to complete. Which includes planning the system from beginning to the very end. unlike most of my builds being from 3-8hours for water cooled systems. This was many steps beyond. – Lastly must mention thermal paste and pads, which all paste was Thermal Grizzly and the pads used for the video card and ram was Fujipoly Extreme XR-M. All pads were replaced anywhere possible, and paste used to improve thermals of video card, CPU, motherboard etc.

7. Nvidia RTX2080ti 11gb (asus dual was the base card I started with) added the EKWB Waterblock that is polished Nickel and clear acrylic and also has the optional polished Nickel backing plate. This was mounted in the vertical slot in the Phanteks case which is an optional kit that was purchased separately. I would have NEVER done this with an aircooled 2080ti since they obviously get too hot…. however watercooled is no issue and purely an aesthetic choice at this point.

8. Majority of all fittings are either Barrow quad sealed nickel plated finish for solid 14mm tubing, some Byski fittings and some EKWB. The tubing is all Pure Red Copper with chrome plating from Barrow/Byski. I went overkill with fittings and well over 40% of the cost of this build was in the watercooling bits.

9. There are some RGB bits added from Phanteks that was added to tastefully add lighting. Usually its set to subtle lighting. 

10. JCat Femto clock USB dedicated PCIe card for audio grade external gear like my Dac, Amp and headphones which I can get into later.

11. The power supply many people may think i’m insane for choosing, yet I carefully chose the Corsair AX1600i PSU for the reason it has the lowest ripple noise of any PSU on the market, and this can help for audio related tasks. Second reason was that I knew the fan speed would NEVER be on, therefore the noise spec would be dead silent…even under full load. So this alone was the major reason I chose to go WAY overkill in this department.

12. Cablemods helped me get some of the very first ever made Pro series cables that have the new aluminum combs that were made for a single comb type dual 8pin PCIE cable setup. I was fortunate to get these for my build. And Matt @ Cablemod was great to deal with and we talked a lot about custom builds and I expressed my urgency to have this dual PCIE comb piece for my build. I think my color scheme of UV purple, chrome or polished nickel, anthracite grey/black is all very clean! These cables really help tie it all together! What do you all think?

13. Monitor i’m using is the Asus PG27UQ which is the first to have 4K 144hz, gsync and HDR1000 all together. However you only can have HDR at 98hz really…this is OK for me. And I can’t be happier with this monitor. It works very well for photography with perfect color and works very well for gaming with vivid beautiful smooth 4K graphics that are well above the typical 60hz panels that are common.

14. Mouse is the Swiftpoint 700 and runner up mice are the Roccat AIMO and Razer Basilisk 

15. Keyboard is a Corsair Platinum K95 with a few custom keycaps I’ve added.

16. External Sound (headphone setup)- HoloAudio Kitsune Tuned Edition Spring2 DAC, HoloAudio Azure Amplifier, iFi Pro iCan Amplifier, Meze Audio Empyrean Headphones, Hifiman Susvara Headphones, Sony Z1R Headphones, Hifiman Arya Headphones, Audeze Mobius (for gaming), and Meze Audio Neo Classics.

17. External Sound (bookshelf speakers) – Vanatoo Transparent One speakers w/ Definitive Audio Supercube 2000 subwoofer – I highly recommend these bookshelf speakers with the ISO acoustics Aperta stands which improve imaging significantly. The subwoofer is overkill if you want some seriously insane sub bass and don’t have a lot of space. Just the speakers alone will product lower freq than other bookshelf speakers that are 3-4times it’s cost. I love these significantly more than the KEF LS50’s 

Posted on 2 Comments

NEW Products coming soon! and new updates! – KTE SU1 DDR, KTE-UIP-1, Singxer UIP-1 and KTE Dual Rail Triple Parallel LT3045 PSU, KTE Dual Rail Quadruple Parallel LT3042 PSU


KTE PSU – Triple Parallelled LT3045 – Dual Rail 

Here is a sneak peak on a DIY product we will have in our store soon. This is dual rail or two power output PSU. Based on the LT3045, however we are using three LT3045’s in parallel which further reduce noise by several multiples. This will be an extremely low noise compared to standard LT3045 PSU’s you’ll find elsewhere. Also the components used in this build are all top notch therefore will be based more on performance than with budget in mind.

We will offer DIY versions where you will be able to buy just the PCB as is and you build entirely yourself. We will include a complete BOM (bill of materials) that can be ordered from digikey or your favorite parts supplier. You should have basic electrical knowledge to complete this project and moderate to skillful soldering experience.

We also will over partially complete versions that will have just the LT3045’s installed to the PCB. Since these boards are not for anyone who isn’t very comfortable with soldering difficult small pitch SMD components.

Lastly, we we are considering offering complete PSU’s ready to go and voltage set. These will just require you to choose a transformer and hook it up yourself. We would recommend a quality O-Type transformer or R-core. Or a Talema if you’re on a budget.  These complete boards won’t be cheap so we are still deciding if we may offer them.

Each Rail is capable of 1.5A output and can be adjusted from 0-15V

Pricing is still being determined for .  but the base pcb with no components will start at 24.99


 KTE PSU – Quadrupled Parallelled LT3042 – Dual Rail

This is another DIY product we plan to bring to our store in the near future. This is another DUAL rail PSU in a subcompact and super performance package! This is quad parallel LT3042 and easily <0.4uV output noise and approx 1A per rail.

These boards will be similar pricing as the LT3045 PSU’s. We would like to hear from our customers if you’re intersted in these DIY PCB’s. We will have many more DIY PCB projects coming in the near future.

These boards are designed for maximum performance with excellent quality components in the BOM. Components can be easily purchased through Digikey and Mouser etc.


NEW Product – Singxer UIP-1 USB Isolation Processor  (email us if you’d like to order one of these!)


Singxer has brought  us the wonderful SU1 that everyone has a high regard for and respects for being one of the best products on the market of it’s type. Now they have released a USB isolation product that is targeted for affordability and performance in one. It’s truly the most affordable of its kind when it’s priced at only $260!!! Other products on the market of this type are all over $300usd!

The UIP-1 has the Sillana chipset which some of the other products on the market have this isolation chipset.

Description

Full compliance with USB2.0 compliant,supports hot-plug,while supporting USB1.0 and USB1.1, Plug and play

Transparent to host and device: wide compatibility to all operating systems, embedded systems and devices

Works out of the box, no drivers needed.

Advanced USB input port ESD protection up to 15,000 volts IEC air-gap discharge.

Connectors: host-side USB-B; device-side USB-A

Powered by DC input 2.1mm/5.5mm -requires 5V power supply or included DC cable to type A USB connector (powered from usb port).

USB 2.0 high speed isolator, the support rate of up to 480Mbps, the isolation voltage up to 4kv RMS.

This product has true total isolation that includes USB power and ground circuits. Isolating front-end complex noise and electromagnetic interference.

Isolating USB signal after signal reforming into the USB controller chip, effectively removing a significant amount of jitter using local quality clock output after the restructuring.

USB type A female USB output after the isolation. the output’s power internally cleaned after being processed through an ultra low noise voltage regulator. This DC power input can be powered from your choice of psu with ultra low noise which can further improve performance with cleaner power.

USB maximum output currents of up to 1A and 40uV output noise.

DC interface – 5.5MM/2.1MM – supports 5-9V DC input and recommends 6V input for optimal performance.

(Note:when using a 5V,the internal 5V regulator is not functioning,but can will output the 5V when power input is more than 7V

Contains the complete CNC aluminum alloy shell and product packaging.

Size:112mm*72mm*26mm
Weight:0.2KG

Package
USB to DC power supply cord


UPDATE: The KTE UIP-1 DDR (dual discrete regulator) approx 3uV output noise and -124db PSRR from 20hz-100khz!!!

  • Fitment of the ULN discrete regulators is very tricky due to very limited clearance inside the chassis. Each regulator is carefully and securely soldered to the motherboard with Mundorf Supreme 9.5% silver solder.
  • Upgrades include two ultra low noise discrete regulators. One of them is on the USB input side (dirty side) and is a 3.3V ULN discrete regulator. Also another 3.3V ULN discrete regulator on the clean side. Upgraded caps to RR7’s @ 7mOhm ultra low ESR caps. Caps are soldered with Mundorf Supreme 9.5% silver solder.
  • photos show the optional Industrial USB connectors (improved impedance) – optimal performance (add $60usd) (chassis must be modified to allow fitment of these connectors) Connectors are soldered with Mundorf Supreme 9.5% silver solder.

KTE UIP-1 DDR – $399usd

KTE UIP-1 DDR w/Industrial High Retention Orange Connectors – $459usd


Above is a stock UIP-1 with standard USB connectors (black in color, low retention) – standard regulators and caps


UPDATE: The KTE SU1 DDR (in stock now!)


standard upgrades : silver/rhodium fuse, silver hookup wiring (air dielectric), dual discrete regulators (3.3v and 5v), wima film caps, nichicon input caps, panasonic output cap for each regulator, KTE badging for chassis, individual serial number

optional choice- Either Sanyo/Panasonic Oscon caps or Nichicon RR7’s.

optional upgrade – replace USB connector with Industrial High Retention connector

Two finishes available – in Black/Copper Signature Edition and also available in Silver/Stainless Steel


Last photos are of my personal KTE-SU1 DDR – SU001337  🙂   I’ve been waiting to get this serial number for a while.

Tim’s KTESU1 DDR

Tim’s KTESU1 DDR

Tim’s KTESU1 DDR


Posted on

Quick instructions on how to open the Spring Dac chassis


3 screws on backside. One in middle, and one on each side. Remove 3 then flip Dac upside Down.

On the bottom there are 10 screws to remove and shown in the photos exactly which ones to remove and which ones to leave in- once these are removed you can slide the face forward and away from back panel. IMPORTANT: Only slide about 1inch and then slowly and carefully pull up and angle the rear upwards and the face downwards.

PLEASE NOTE: There is a fragile ribbon cable that must be detached for both pieces to be separate. The photo of the USB module below shows the ribbon plug above it. It’s pressure fit and can be pulled out and pushed in carefully upon reinstall. Just be careful as ribbon cables are somewhat fragile if too much pressure is put on them at the wrong angle.

if you want to remove or replace the USB module, here is a photo of it, and requires two screws to remove and simply pull upwards to unplug.


This is a quick run down on how to open the Dac properly. Please email us if you have any questions. This process should take about 3-5minutes

-Tim Connor


Posted on

CanJam SOCAL 2017 – Photos from the event and of our booth.

[metaslider id=2651]


Posted on 1 Comment

NOS vs OS (no oversampling vs oversampling)

Sample rate, non-oversampling and oversampling


We know that in the real world, music is continuous, the image is continuous. TV or film, in fact, is composed of a static picture of the screen, the static picture of the rate of rapid switching, the human eye to see a continuous picture. So, how fast the continuous picture? Is a second 50, as long as this rate, the human eye will not be aware of the intermittent switching between the screen, of course, a second 50 is a minimum requirement, if you can do more faster, it can be Improve the visual effects. For audio, it is the same concept, sound information, as long as the intermittent information is enough, they can be interpreted as a continuous ear music. So, the human ear how much intermittent information can be interpreted as continuous information? Let’s first talk about the human ear can hear the frequency range, 20-20000 Hz. So, if you want to reflect the highest frequency of 20K, then how much intermittent information is needed? Here, I need to introduce a proper noun “Nyquist frequency”, the specific principle we do not need to go into here, we only need to know the results on it. As a result, at least twice the “intermittent information” of 20K is required to express a frequency of 20K. Here, we will be a “intermittent information” as a sampling point. In other words, If we have to be able to reflect the 20K audio, you need at least 40K a second sampling point. So, we come back to see the standard CD, CD standard is 16bit / 44.1Ksps. In this article, we will not explain what is 16bit, which in the follow-up article I will explain. The 44.1Ksps is the sampling rate, we can see, from the theoretical minimum of 40K, only about 10% more margin, a little reluctantly.

In the CD has just appeared, there is no oversampling technology, but as people found that the sampling rate of 44.1K is not enough, how to solve the problem? So over-sampling technology was born. So what is oversampling? Simply put, because 44.1K sampling rate is too reluctantly, if there is a higher sampling rate is bound to have a better effect. However, we recorded in the CD information only 44.1K a second, how to become 88.2K, 176.4K or even higher? This needs to do the interpolation operation, through the mathematics method, calculates the missing sampling point, then insert to original sampling points.

In the oversampling operation, an integer multiple of oversampling is the easiest to do, not prone to problems. Therefore, we should ensure that the oversampling is an integer multiple, if not an integer multiple, such as 44.1K oversampling to 48K, which requires higher computing resources, very prone to problems, it should try to avoid this situation appear.

Today, digital audio in the oversampling of the road has farther and farther, 4 multiplier, 8 multiplier is not surprising, 16 multiplier, 32 multiplier or even higher, this is the mainstream trend. If it is 32 multiplier, then only 1 of 32 sampling points, is from the original record information, and the remaining 31 sampling points are derived from the interpolation calculation. So, can we really trust the 31 sampling points from interpolation? This is what we need to discuss the following topic.

Have to say, the mainstream audio technology, and even designers, have confidence in the 31 calculated points of the sample. But the real fact is that audio-specific applications are not suitable for use with oversampling technique. Now more and more people are aware of this problem and found that they had previously believed in things, in fact, there is a problem. Yes, we are now in the process of negating the current mainstream technology. It is like China has finally realized the importance of environmental protection, began to cut a lot of high-polluting industries, although those highly polluting industries have brought us wealth, but we now pay more attention to the environment, about wealth, we can use other methods.

The advantages of oversampling

Before talking about the problems of oversampling, let’s talk about the benefits of oversampling. Audio technology industry are not all fools, If there no good things, no one will be interested, how it will be developed till today?

First of all, If we analyze the spectrum rate of a signal with sample rate of ‘F’,  Then will have a center in F / 2, the left and right part of spectrum is mirrored at this center point, assuming a 1K audio signal at 48K sampling rate, then, in the spectrum, you can see that there is a signal at 1K, also have another signal at 47K.

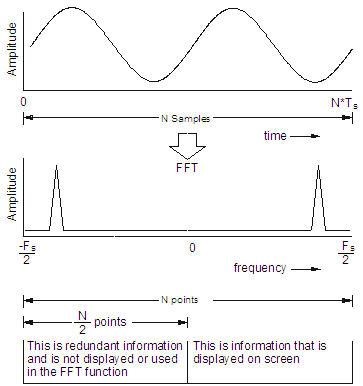
Therefore, we can see, half of 48K is 24K, 24K as the center, 1K signal and 47K, is a mirror image relationship. Similarly, if a 5K signal, there will be a 43K of the mirror signal.

The frequency of these mirror images are distributed in the 24K to 48K, although the human ear can not hear more than 20K frequency, it can be ignored. But if the following amplifier is not ideal, two different frequencies may cause intermodulation distortion (IMD) to produce a new frequency falls within the audio range. Therefore, in order to eliminate the hidden troubles, reduce the demand for the following amplifier, these signals outside the audio bandwidth should better to filtered out. Then the problem is that the analog filter, if you want to protect the 20K bandwidth in the amplitude and phase to be flat, but also filter out those very closed 24K-48K signal, which becomes impossible, although a high-order analog filter can be very steep cutting, but it has great impact on the audio bandwidth inside 20KHz, the result is not worth the candle.

The other advantages of digital filters is that they can be perfected in the frequency domain. Digital filters can be used for oversampling and filtering easily. For example oversampling 4X times, 48K * 4 = 192K. 192K half is 96K, then 0-20K audio signal to 96K as the center of the mirror image is 176K-196K. Which has been opened in the middle of the buffer zone is large enough to allow the analog filter to work well.

The Audio Engineering Society has specified a measurement standard for DAC and digital amplifier measurements, called AES-17, which requires a complete filtering off signals outside the 20K audio range to avoid problems affecting measurements. If the DAC is over-sampling, even if not in accordance with the standard will not have any impact, because the out-band of the signal has been filtered out off very clean. However, if the non-oversampling DAC, if not in accordance with this standard will cause the measurement results will be wrong.

In addition, in the high frequency part, if the oversampling processing is not performed, the amplitude of the sample will be attenuated due to the lack of samples. If at 48K sampling rate, signal at 20K will be 2-3db attenuation. Over sampling process will not have this problem.

The problems of oversampling

As you can see, oversampling is really a very good technology and it solves a lot of problems. It can be said that, based on the digital filter, over-sampling technology is perfect at frequency domain, even the very simple digital filter, the performance in frequency domain is awesome. Well, then, we have to talk about is the problem of oversampling, which is why we want to reject this technology.

First, oversampling will have a ringing artifact. A pulse signal without oversampling should be as shown in Figure 1, but the oversampling technique we are using now leads to distortion in Figure 2, or Figure 3.


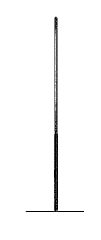
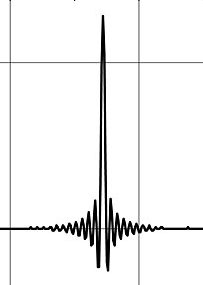
Figure 1                      Figure 2                                       Figure 3


In Figure 2, we see that when a signal is transformed, it produces some ringing before and after the transform. There is some new technology which can result in Figure 3, which can effectively remove the pre-ringing, but the post-ringing will become quite large.

From a musical point of view, the pre-ringing is like there is something came out before a note should appeared, this will cause some oddly feeling. Post-ringing is like echo, resulting in some additional reverb, the playback environment will usually have a certain reverb, for example, if we in the room, the sound is from multiple souces. First, the sound source generate Direct sound to you ear, then there sound will reflect on the wall then reach to you ear, and some are reflected several times before it reaches to your ears. It should be noticed, the post-ringing in Fig. 3 is much bigger than in Fig. 2, so when it reaches that level, you will feel the sound is lagged and the transient will be poor. In addition, the post-ringing should disturb the original room reverberation, resulting in the positioning of the instrument in the sound field has also been a problem. The reverberation mode of a room is fixed, but the post-ringing generated by oversampling is subject to change all the time. So the sound field will be confused, the position of instruments are flying. From the listen experience point of view, I personally think that Figure 2 has smaller problem than Figure 3.

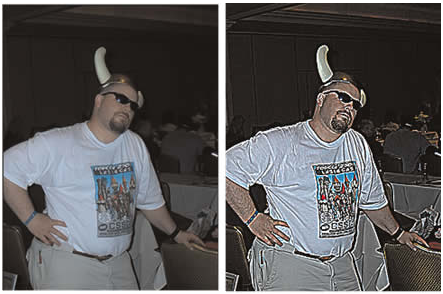
If from the waveform you can not directly understand how the ringing artifacts can affect the listening experience. The following picture may be more intuitive to understand, because the ringing effect also exists in the image processing.


The left is the original image, the right is ringing artifact. Maybe some people will think that the right is the high-resolution details, edge sharpening will highlight some of the lines, but at the same time the loss of delicate texture and natural transition. Have you noticed behind this men, there is a men in black, he is watch back. In the original image, we hardly notice that person, but in the right image, it is much easier to noticed. So, as an audiophile, which do you like?

Why the above problems look so bad, but still haven’t been noticed as a big problem for a very long time? Because the audio industry using spectrum analysis to measure various standard specs. The digital filter which we used for over-sampling, has perfect performance in frequency domain. But in the time domain, it is very bad. In an easy word, the frequency domain is equivalent to the content, time domain is equivalent to the order.

For example, the following statement, the content is complete,

  1. Little monkey can not find the father and mother, very anxious.
  2. Little monkey can not find the father, and mother very anxious. (A small change in the order, but has caused ambiguity)
  3. Dad can not find mother, little monkey very anxious. (Greater variation in order, greater ambiguity)
  4. Dad not find can little, very mother monkey anxious. (More chaotic order, although the content is still complete, but has no meaning)


Moreover, the missing information, whether the mathematical calculations can be very good to calculate the missing information and make up for it?

Here, we first talk about people’s vision and hearing, eyes and ears is just a pick up information organ, the information is transmitted to the brain, the brain has a special part responsible to interpretation of these informations. The brain is very powerful of these analysis Functions, Our modern science, even with a super computer, can not compete with a brain. How brain can analyze these information so powerful, is still a myth to our modern science.

As a visual example, we know that we need two eyes to form a three-dimensional vision, that if you try to close one eye, you will experience some impact, but not very big, you can still know how far the objects is away from you. You can still have daily life without much impact. The 2D information capture with one eye only, after the analysis of brain, can easily make up three-dimensional information which the original information do not have.

As an example of hearing, we know that we have only two ears, in a horizontal line. So, we distinguish left and right in the sound field is very easy to understand, because the two ears are in a horizontal line. But why can we tell if the sound is coming from up side or down side? This is also because of the brain has done some very complex calculation, and make up those vertical information which was not able picked by two horizontal ears.

Above these two examples, we can not use modern science to achieve, even if we ignoring the cost. But the human brain can achieve it like a piece of cake.

If there is a very simple sentence

1234567

The middle one is lost

123_567

The lost information, the computer is very easy to fill. For the human brain, it is also very easy to fill


Again, if there is now a slightly more complex sentence

Little monkey can not find the father and mother, very anxious.

One word is lost

Little monkey can ___ find the father and mother, very anxious

If the audio digital filter try to fill it, will be a strange result like this

Little monkey can can find the father and mother, very anxious

But for the human brain, the correct fill this information is not a bit difficult, the human brain analyze the rest of those messages to understand the meaning of the whole sentence should have, so that the correct fill that missing information.

Therefore, the conclusion comes out, for simple and monotonous information, the existing calculation method can be used to fill it correctly. However, the more complex information, the more the existing calculation method will fill in the wrong information. The human brain, is much more powerful in this case.

For the missing information, the traditional audio industry believe “there is always better than nothing”, but this is actually a wrong direction. For people, ” rather go without than have something shoddy “, a wrong information is far more harmful than no information. Without this information, our brain can make up. But if there is a wrong information will be misleading, and also lost the opportunity to make up by human brain. This is like a pot of soup lack a piece of meat, that may not be a big deal, but if you make up a dead rat into the soup. Rats are also meat, for measurement specs, a pot of soup that maked up enough of the meat, is a better result.

Measurement and listening

Here, we can see that, for audio, we should understand that the audio industry’s existing measurement spec. can not correspond to people’s listening experience. We are not able to use those number to quantify our listening pleasure. These spec tend to be analyzed from the completeness of the content. However, this is not the case for human feelings. Complete information, but the order of the chaos will have disastrous consequences. Likewise, more information is not meant to be better than less information, and a well-designed non-oversampling DAC, we will find richer and more natural details.


2 is greater than 1, even primary school students know it, but more advanced wisdom is to know how to do correct trade-off. Less is More